What is Google Discover?
Google Discover is a mobile-centric feature designed to introduce users to content they may not have actively sought out. Unlike traditional search experiences, the emphasis on active searching is minimized. By learning about user preferences, the system continually presents fresh content as users swipe through the interface.
The content suggestions on Google Discover are tailored to individual users based on their search history, application usage, location history, and location settings. Users have the option to follow specific topics or entities, thereby shaping their profile and influencing the type of content Discover surfaces for them.
Originally exclusive to mobile devices, Google Discover is now expanding its reach to desktop users. While Google search results generate considerable traffic, Google Discover has proven to be a significant source of traffic, offering a distinct and valuable browsing experience.

How to get your content in Google Discover
Achieving visibility in Google Discover closely mirrors standard SEO practices, with no stringent prerequisites. The foundational principles of SEO apply, emphasizing the importance of practicing Holistic SEO and strictly adhering to Google’s guidelines and policies. A key requirement is the creation of exceptional content tailored to the appropriate audience. Additionally, a well-designed website that provides an exceptional user experience is essential. While there are no rigid criteria, it is important to consider certain factors to optimize the chances of having your content featured in Google Discover.
How do we get rid of it?
Google Discover is a personalized content feed that curates news, articles, web stories, and videos based on users’ browsing history and preferences. This feed is prominently featured in the Google app on Android phones and appears in Chrome as well. On Android devices, it is often showcased on the primary home screen, accessible by swiping left from the home page or by accessing the minus one screen. This tailored content feed is also accessible on iPhones through the Google app and in the Chrome browser.
Notably, in the coming days, the Google Discover feed is expected to extend its presence to Chrome browsers on desktops. Anticipated to drive significant traffic, content creators need to understand the steps needed to appear on Google Discover.
Major Points on Google Discover
There are a total of 10 points that you have to cover on your web page and website but if you do it, then no one can stop you from coming to Google Discover.
Let’s look at the major points one by one
- Optimizing Your Web Page: Enhancing User Experience with High-Quality Images
- Understanding and Implementing the Max Image Preview Robots Meta Tag on Your Web Page
- Strategic Consistency: Aligning Your Meta Title with Page Content for Impactful Web Presence
- Exaggeration Don’t Bring Too Much Sensationalism In Your Title, Description And Thumbnail.
- Follow the Trend Of Educate
- RSS Feed Should Be There and It Should Be Enabled
- Do Not Disallow RSS Feed In Robots.Txt
- Must Follow All Google Policies
- Give Disclosure Of Ad Disclosure Or Sponsored Content.
- Clear Information about the Author, Publisher and Website
1. Optimizing Your Web Page: Enhancing User Experience with High-Quality Images
Google Discover, ensures that your webpage features high-quality images with a width exceeding 1200 pixels. While there is no specific Google guideline regarding image height, it is advisable to maintain a proportional and visually pleasing aspect ratio.
Additionally, avoid incorporating distracting elements such as ribbons or towers on your webpage. Keeping the design clean and focused on the content enhances the user experience and increases the likelihood of your page being featured on Google Discover.
But what do I mean by high-quality image?
The image presented on your webpage should exhibit clarity and sharpness, avoiding any blurriness or pixilation. Adequate lighting is crucial, and the image should not be captured in low-light conditions, minimizing any potential noise.
It’s okay if it’s more than 1200 pixels but it should be at least 1200 pixels.

2. Understanding and Implementing the Max Image Preview Robots Meta Tag on Your Web Page
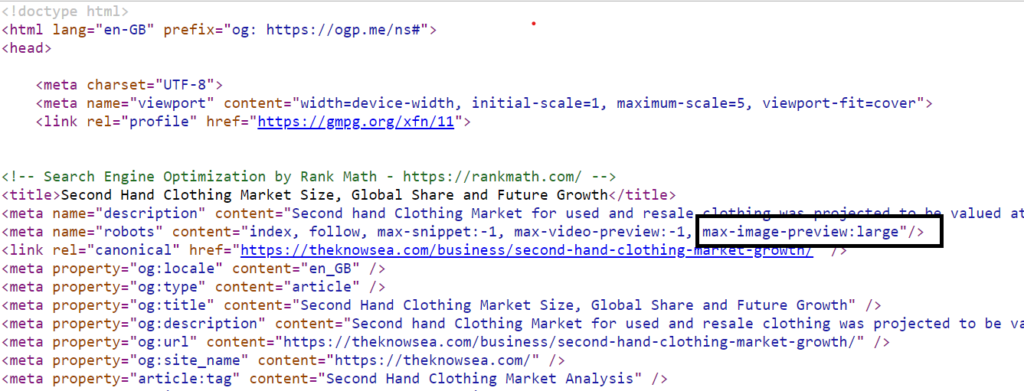
Ensure that your robot’s Meta tag is configured with the setting “large.” Despite the name, don’t be confused by the term “robots meta tag”; it encompasses various directives, such as “no-index” and “no-follow.” These directives control how search engines index and follow links on a page.
Similarly, the “max image preview” is another type of robot Meta tag with three options: “None,” “Standard,” and “Large.” Opting for “None” ensures that Google refrains from displaying your images in the preview. Many users employ this setting to prevent Google from directly featuring their website’s images in search results, particularly in position 0 within rich results. This choice is a strategic measure to exert more control over the presentation of images associated with their content.
Now, the second option after this is standard.
Selecting the “large” option for the “max image preview” setting is crucial for visibility in the Google Discover feed. When set to “standard,” Google may use a small image, but only by choosing “large” will Google be permitted to utilize a full-width image in the Discover feed, enhancing the visibility of your webpage on this platform.
To check your current setting, right-click on your webpage, select “view page source,” and then use the CTRL+F or CMD+F function to search for “max-image-preview.” If you find a line with this code in your page source, it indicates the use of the robot’s meta tag. Examine what is written in front of “none,” “standard,” or “large.” If it reads “large,” no action is needed. However, if it reads “none” or “standard,” you must modify this setting to optimize your web page’s appearance in the Google Discover feed.
Now how to change this setting depends on the platform of your website.
If you are using a WordPress site then you can go to your SEO plugin and change this setting you don’t have to change anything this plugin will automatically change this setting to large.
3. Strategic Consistency: Aligning Your Meta Title With Page Content For Impactful Web Presence
The title plays a pivotal role in the Google Discover feed, as it significantly influences whether a user will click on your page. If the title does not accurately reflect the content, users may feel misled upon clicking, resulting in dissatisfaction. To ensure a positive user experience, it is crucial to align the title precisely with the content of your page. This ensures that users receive the information they expect, promoting satisfaction and engagement with your webpage.
4. Exaggeration Don’t Bring Too Much Sensationalism In Your Title, Description, And Thumbnail.
In the Google Discover feed, adopting a clickbait-style may indeed increase click-through rates (CTR) and attract more views. However, it’s crucial to strike a balance in crafting meta descriptions and thumbnails. Avoid making exaggerated or sensational claims solely for garnering views. Instead, focus on accuracy and creativity in presenting your content.
In the realm of SEO creativity, the challenge lies in crafting interesting titles without resorting to clickbait tactics. While steering clear of overblown claims, you can infuse creativity into your titles to captivate audience interest. The key is to find a middle ground where your content remains accurate, avoids sensationalism, and still sparks curiosity through creatively crafted titles.
5. Follow The Trend Of Educate
The next critical element is your content. Whether you create content on the latest trends or offer unique information, it’s vital to recognize that Google Discover operates as a feed. Users scroll through it much like an Instagram feed, not actively searching for a particular topic or seeking specific information.
To capture the audience’s attention, consider providing content that aligns with current trends or imparts unique insights. This approach is effective because users in the Discover feed may not have a predefined topic in mind. By offering information on what they might not know but could find intriguing, your content stands a better chance of attracting clicks. Whether it’s an article or a video, providing details can enhance the user experience and encourage more engagement.
6. RSS Feed Should Be There And It Should Be Enabled
In WordPress websites or Blogger platforms, the default RSS feed or Atom feed is enabled. We previously created a video for WordPress websites on how to block the RSS feed, specifically geared towards business websites aiming to avoid inclusion in the Google Discover feed. However, it’s essential to note that if you actively use and need the RSS feed, it is advisable not to disable it. Enabling the RSS feed function is necessary for appearing in the Discover feed.
A notable issue arises regarding RSS feed URLs: Google crawls them but does not index them. This is because the content within the RSS feed is identical to that of the page, and Google deems indexing the page itself sufficient. To address this, in the Google Search Console, within the “Currently not indexed” or “Discovered currently not indexed” section, it’s recommended to ignore the feed URLs. This won’t result in any loss, as not every element requires attention or resolution.
Furthermore, it’s unnecessary to block or disallow your RSS feed URL in the robots.txt file. This step ensures that your RSS feed remains accessible and contributes to your visibility in the Google Discover feed.
7. Do Not Disallow RSS Feed In Robots.Txt
Blocking or disallowing feed URLs from the robots.txt file means that Googlebot is prohibited from visiting and accessing the content within those URLs. Disallowing implies a clear restriction. If Googlebot cannot visit and read the content, it won’t be able to display the updated information in the feed.
To ensure accurate and current content in the feed, it’s crucial to keep the feed updated. Additionally, be mindful of caching plugins that enhance website performance. Ensure that these plugins do not cache the feed URLs, as caching might result in outdated information being presented in the feed. By allowing regular updates and preventing caching interference, you can maintain the accuracy and relevance of your content in the feed.
8. Must Follow All Google Policies
If your content contains elements of vulgarity, hate speech, extremism, scams, danger, or harassment, Google will not permit your pages to appear in Discover. These issues extend beyond Google’s policies and may also lead to legal consequences. It is crucial to adhere to ethical standards and legal guidelines, as violations not only risk exclusion from platforms like Google Discover but could also result in legal repercussions from law enforcement agencies. Therefore, it’s essential to prioritize content that aligns with ethical and legal standards to ensure both online visibility and compliance with the law.
9. Give Disclosure Of Ad Disclosure Or Sponsored Content.
It’s essential to designate all sponsored content on your webpage to provide users with transparency. Clearly marking sponsored content ensures that users can easily discern which material is on your website due to sponsorship. This distinction is crucial for users to differentiate between sponsored and organic content.
Moreover, when it comes to links on your page, it’s not sufficient to merely mark them as “no follow” if they are sponsored. Instead, utilize the sponsored attribute to clearly indicate to both users and search engines that a particular link is sponsored. This practice is especially important if you aspire to have your content featured in Google Discover, as using the sponsored tag helps Google properly identify and handle sponsored links on your page. The sponsored tag enhances transparency and aligns with best practices for ethical content presentation.
10. Clear Information About The Author, Publisher And Website
Providing comprehensive information about your website and contact details is crucial for establishing transparency and credibility. Clear details about the author, publisher, and website enhance user trust and engagement.
- Author Information: Present information about the author of the content. Include a detailed author profile that highlights relevant credentials and expertise. Incorporating social media links can further connect users with the author, fostering a sense of authenticity.
- Publisher Details: If your website is the publisher, offer details about the publishing entity. This information can include the mission, values, and history of your website. Providing transparency about the publisher adds credibility to the content.
- Website Information: Include a comprehensive “About Us” page on your website. This section can elucidate the purpose of the website, its history, and the team behind it. Clearly state the website’s mission and values to give users a better understanding of the platform.
- Contact Information: Create a dedicated “Contact Us” page with clear and accurate contact details. Include a physical address, if applicable, along with email addresses and phone numbers. Ensuring that users can easily reach out adds to the credibility of your website.
By incorporating these elements, you not only enhance user experience but also demonstrate a commitment to openness and reliability, which can positively impact your website’s reputation.